Facebook Ads Tutorial
- How To Install The Facebook Tracking Pixel
- How To Set Up A Custom Conversion In Facebook Ads
- How To Create Custom Audiences In Facebook Ads Manager
- How To Create A Lifetime Value Audience On Facebook
- How To Create A Lookalike Audience On Facebook
- How To Set Up A Catalog Feed For Facebook Ads
- How To Launch A Successful Facebook Advertising Campaign
[/et_pb_aio_extended]
You do not need to have PixelYourSite PRO or free installed to complete this tutorial.
Before starting it is recommended for you to have purchased Pixelyoursite PRO as it helps streamline the process of installing not only the Facebook pixel, but other codes on specific and global pages.
There is a paid version which has all of the features unlocked and a limited free version.
Click the Facebook Ads Menu and select “Pixels”.
Click “Add data source” and select “Facebook Pixel”.
You do not need to have PixelYoursite installed to complete this tutorial. If you do not have Pixelyoursite Pro installed, then follow the below section, if you do have it installed click here to skip ahead.
At the set up your pixel window, click “Manually install the pixel yourself”.
Find option number 2 and copy the code from the box.
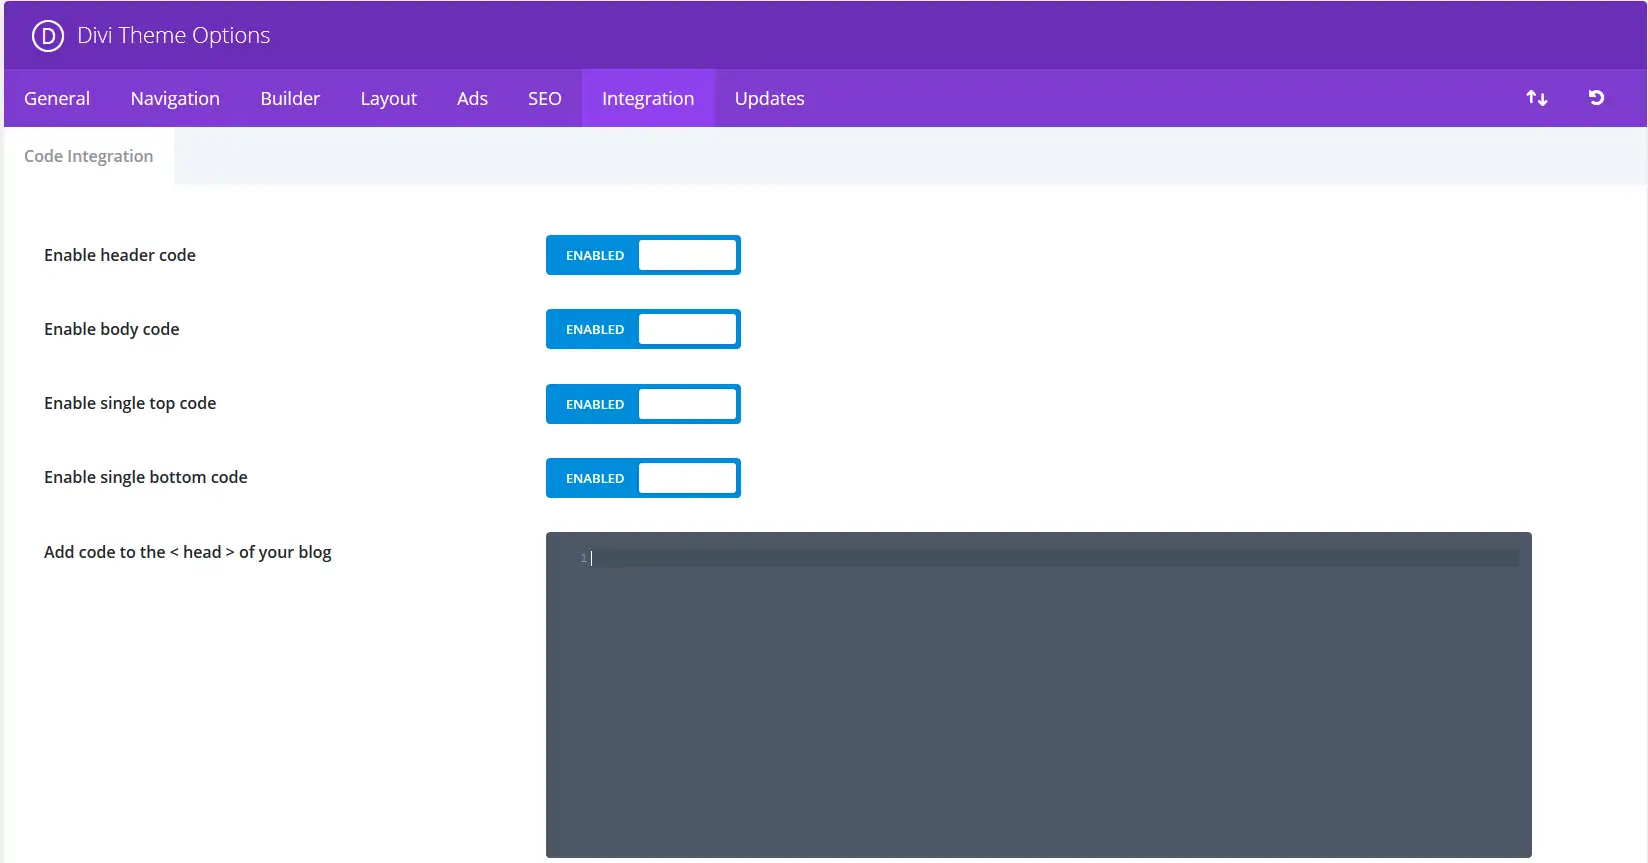
If you followed the How To Set Up Your WordPress Website From Scratch lesson, then you should have the Divi theme installed.
Under the Divi theme options, click the “Integrations” tab.
Paste the code into the Head section and click save.
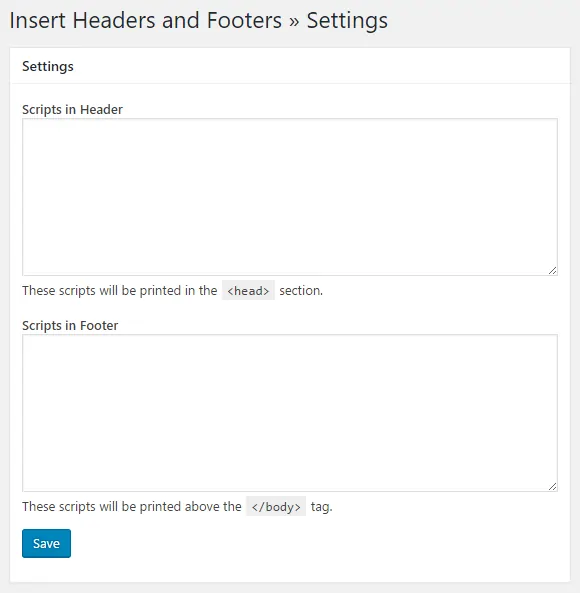
If not you need to add it in the HEAD tag of your WordPress website. Some themes may allow you to add it to every page on your site through a template system but if you have trouble with this, you can download the Insert Headers and Footers plugin.
Install the plugin and search for it in the Plugins link of the WordPress dashboard to find and activate it. Then go the Insert Headers and Footers plugin and click on “Settings.” You’ll now be able to insert the Facebook Pixel code to the HEAD tag for all of your pages.
Congratulations you have installed the Facebook tracking pixel!
If you have Pixelyoursite PRO installed, copy your Pixel ID.
Navigate to the Facebook settings under the Pixelyoursite PRO tab in your WordPress Dashboard and paste your Pixel ID.
Congratulations you have installed the Facebook tracking pixel!
[/et_pb_aio_extended]
Now that you have your Facebook tracking pixel installed, it is time to start creating custom conversions on your website so that you can improve your ad delivery and serve more personalized ad messages.
If you do not have Pixelyoursite PRO installed, do the following. If you have Pixelyoursite PRO installed, then skip ahead.
Before creating a custom conversion, decide which conversions users go through on your website.
- Does a user fill out a form to contact you?
- Do you utilize lead forms?
- Do users create accounts on your website?
- Does a user purchase from your website?
All of these events and more are now trackable.
Login to your Facebook business manager ad account.
Click the Facebook Ads Menu and under the Events Manager Tab, click “Custom Conversions”.
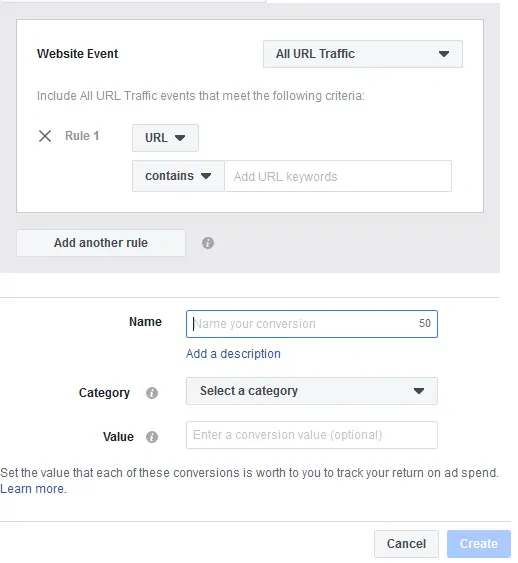
Click the blue “Create custom conversion” button.
For this example, we will create a Purchase conversion based upon our test product being purchased from our Woocommerce store.
- In the Rule #1 area, next to contains enter order-received.
- Name the conversion.
- Select the category, this example is purchase.
Set the value, in this instance, we set the product value since it is the only product in our store.
Click “Create”
Congratulations, you have setup your first custom conversion!
Pixelyoursite PRO Custom Conversion Setup
Login to your WordPress Admin dashboard and select Pixelyoursite PRO in your menu.
Open the Facebook Pixel.
If you have Woocommerce installed, Pixelyoursite PRO automatically detects it, but it never hurts to double check that everything is enabled.
Pixelyoursite PRO has automatically installed tracking code on various points of your website. From blog posts, to product pages, add to cart, checkout, and purchase conversions. These are all already done for you as long as you have Woocommerce for the selling portion.
If you use a program like Gravity Forms or some other type of form submission then you will want to create a dynamic event within Pixelyoursite PRO.
To do this click the “Events” tab within Pixelyoursite PRO.
Click “Add Event”.
Enter your event name, if you are using a lead form with Gravity forms, you can name it lead.
It is best to have it trigger on a page load, such as a submission confirmation page. This also works great for contact form submissions as well.
If you have not already, create a thank you page for your form and redirect the user there after a successful submission.
Copy the thank you page URL and paste it into the “On URL visit” section of the Pixelyoursite PRO page.
Define the event as a lead in this case and click save.
Congratulations, you have set up your first custom conversion!
[/et_pb_aio_extended]
Login to your Facebook business manager ad account.
Click the Facebook Ads Menu and under the Assets Tab, click “Audiences”.
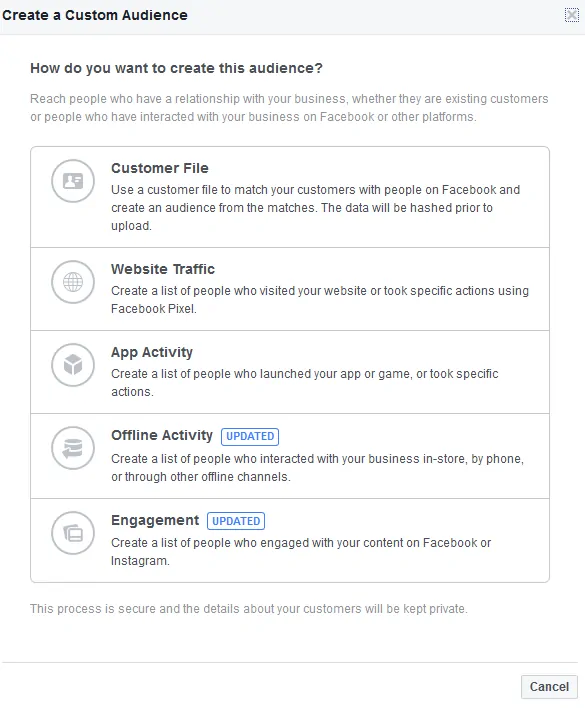
Click the blue “Create Audience” button.
Select ‘Custom Audience”.
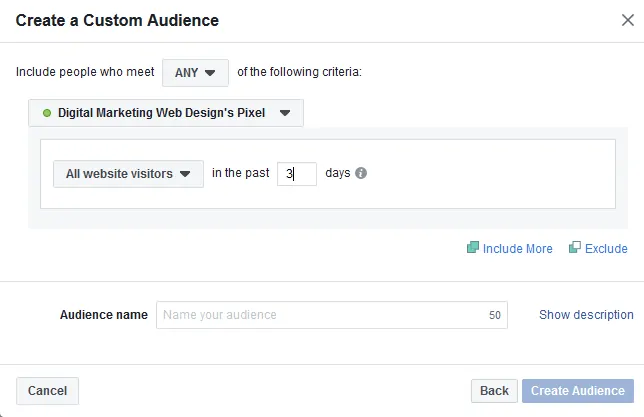
Select Website Traffic.
It is crucial in order to run a successful advertising campaign that you split your audiences up according to actions they take on their website as well as the amount of time since that action was taken.
Start by creating your all leads and purchases audience lists to get the hang of it. For this example, we will use the Purchase event for creating our custom audiences.
Limit all purchases to the past 3 days. These will be visitors who have recently converted on your website.
Name your audience, for example 3 Day Purchases.
Congratulations, you have created your first custom audience on Facebook!
Don’t stop there, continue segmenting your users according to the events and time since the event occurred.
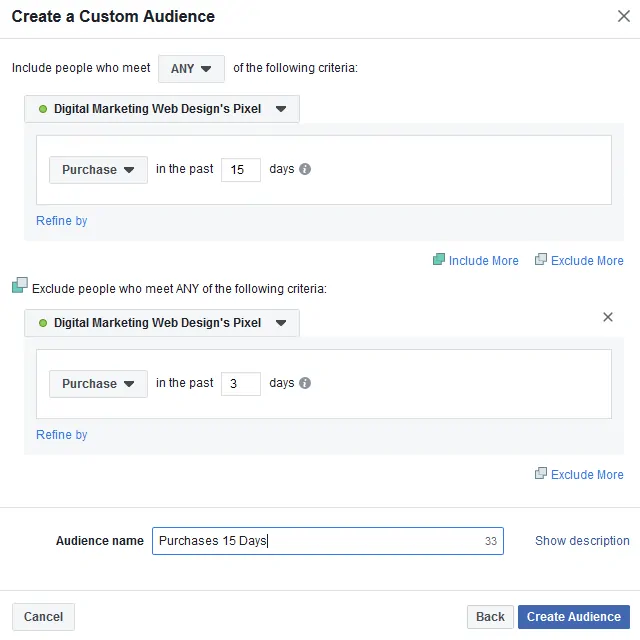
Next, go to create another audience, this time we will limit the purchases to 15 days and we will exclude those purchases in the past 3 days.
After that, create another audience, this time 30 days, excluding those purchases in the past 15 days. Then you will create a 60 days purchase audience, excluding the past 30 days purchases, after that 90 days excluding the past 60, and finally 180 days excluding the past 90 days. You can further narrow or broaden the durations to your liking.
Do the same for each event on your website. You can also create 1 day lists as well.
Congratulations, you have successfully created segmented custom audiences!
[/et_pb_aio_extended]
Login to your Facebook business manager ad account.
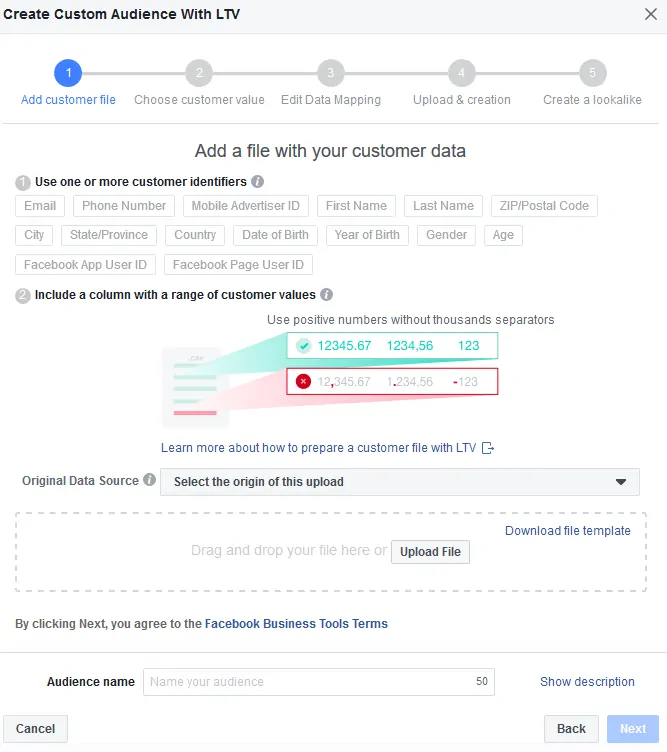
Make sure you go over the data preparation best practices. Download a file template.
Click the Facebook Ads Menu and under the Assets Tab, click “Audiences”.
Click the blue “Create Audience” button.
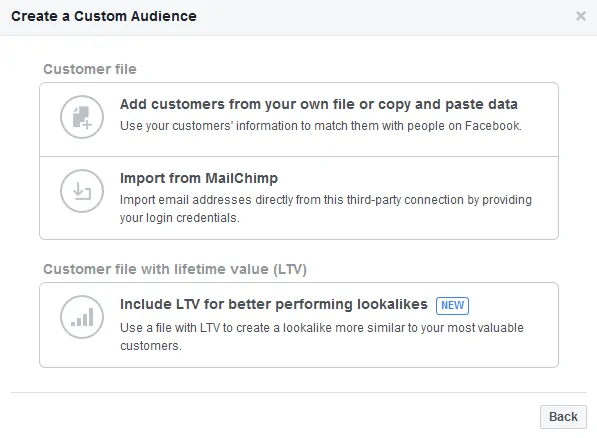
Select ‘Customer File”.
Click “Include LTV for better performing lookalikes”
Select the original data source, in most cases the “Directly from customers” option is fine.
Upload your data sheet and name your audience. Click “Next”.
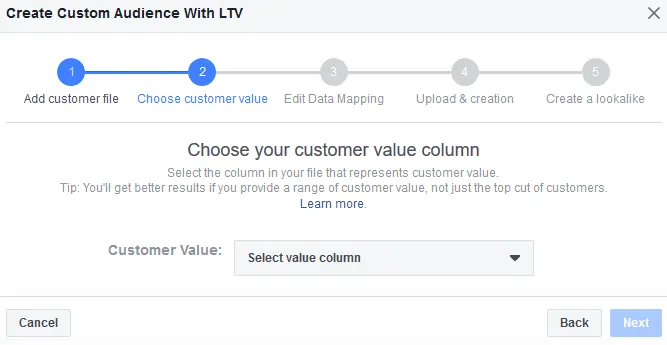
Select your value column. Click “Next”.
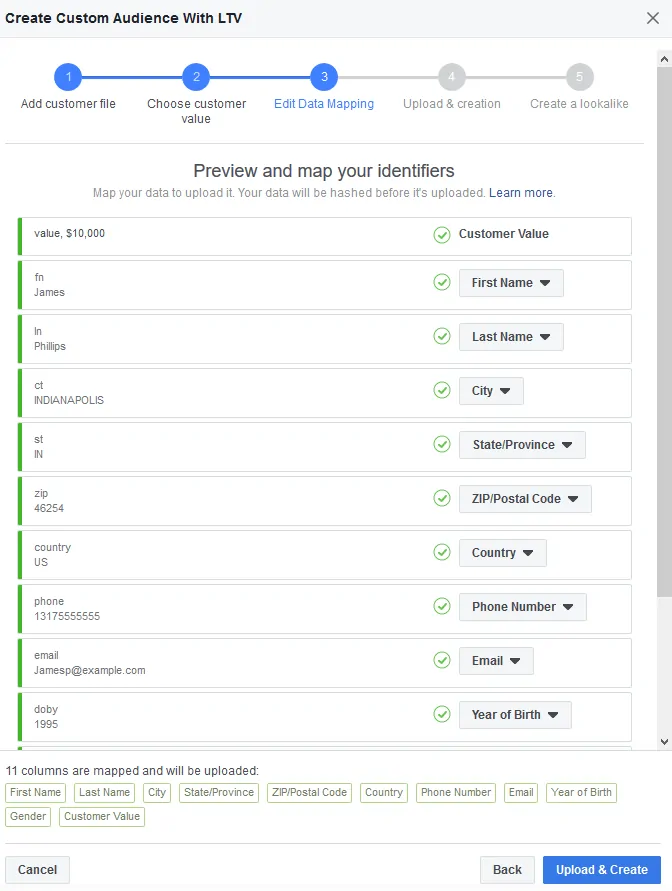
Make sure every data field is recognized and is mapping correctly.
Click “Upload & Create”.
If the upload is unsuccessful you will see the errors.
Congratulations, you have created your first custom audience!
You can now proceed to create a Lookalike Audience.
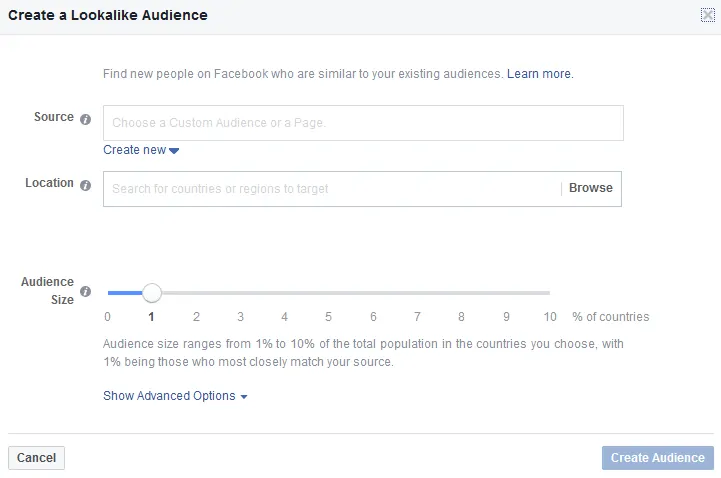
Click continue, set the location you want to target for your lookalike audience.
Click “Show Advanced Options”.
Enter the number of audiences you want to create.
Do not alter the 0-1% audience, that is your most relative audience and should be segmented separately.
Congratulations, you have created your lookalike LTV audience!
[/et_pb_aio_extended]
Login to your Facebook business manager ad account.
Click the Facebook Ads Menu and under the Assets Tab, click “Audiences”.
Click the blue “Create Audience” button.
Select “Lookalike Audience”
The source option will contain all of your audiences you have created so far.
For this example, we will create a lookalike audience for all of our purchases for the past 30 days. You could do the same for your leads audience or any other custom audience.
Select the location you want to target for your lookalike audience.
Click “Show Advanced Options”.
Enter the number of audiences you want to create.
Do not alter the 0-1% audience, that is your most relative audience and should be segmented separately.
Congratulations, you have created your first custom lookalike audience!
[/et_pb_aio_extended]
Setting up a catalog feed for Facebook is simple if you use WordPress and Woocommerce.
Login to your WordPress Admin dashboard and click add plugins. Search “WooCommerce Product Feed” or download it here.
Install the and activate the plugin.
You will have a new option on your dashboard menu called “Woofeed”.
Click the “Woofeed” menu option.
In the Woofeed dashboard, click “Create feed”.
For the template, select “Facebook”.
Name your file, for example Facebook Feed.
Select “CSV” as the feed type.
For the Delimiter, select “Comma”.
For the Enclosure, select “.
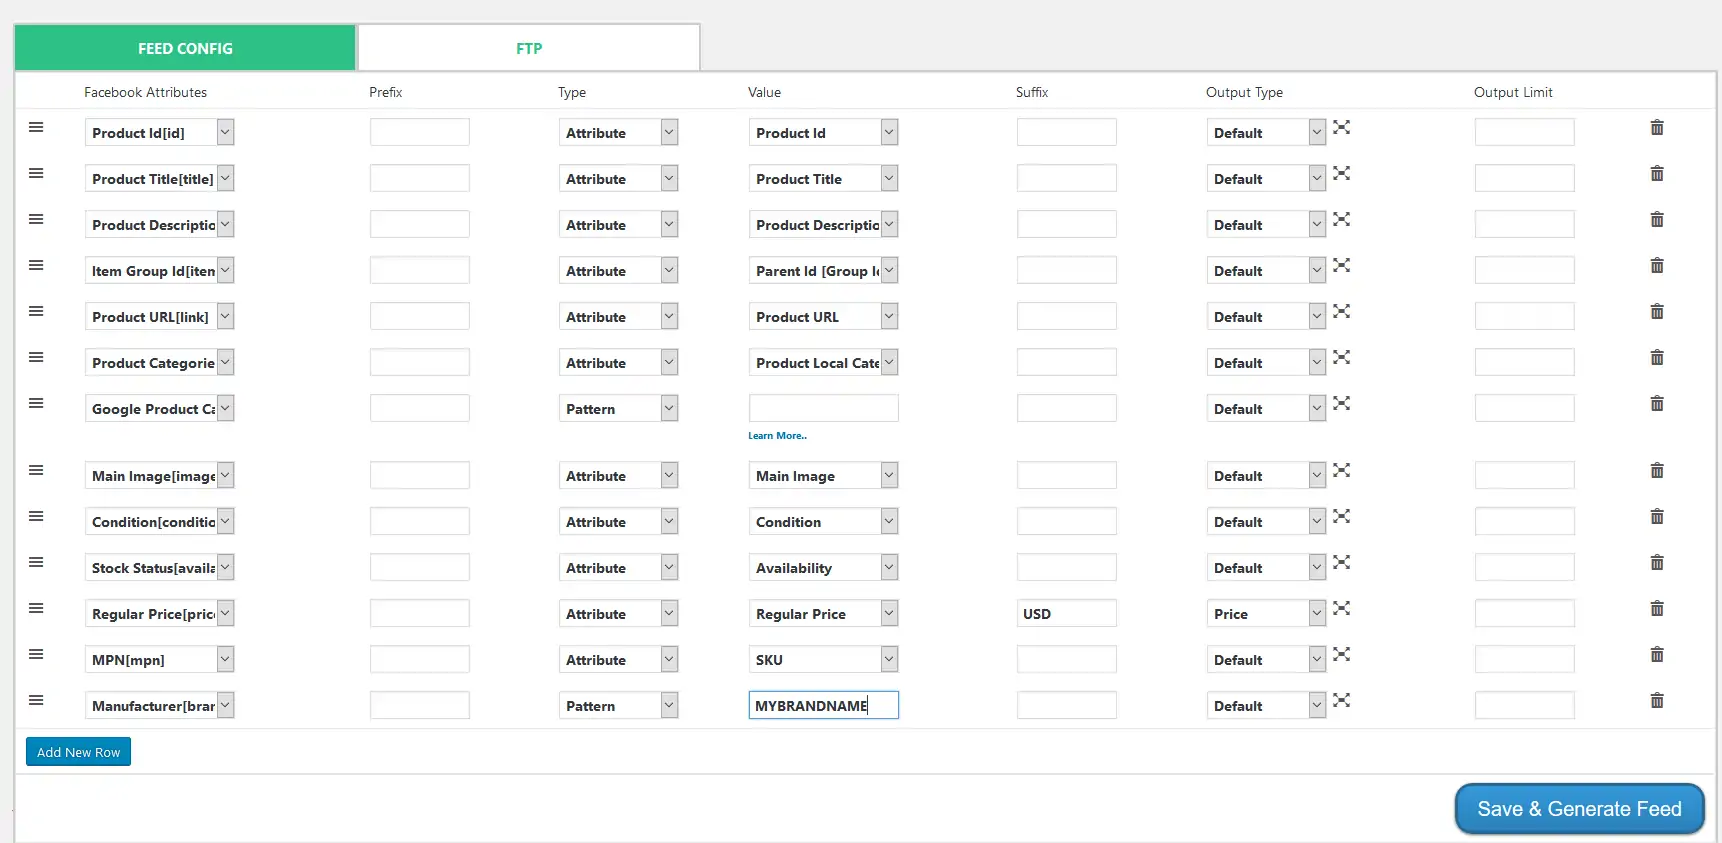
Make sure all of the fields are mapped correctly. You can leave the section about “Google Product Category” blank.
After you made sure everything is mapped correctly, click “Save & Generate Feed”.
Then click “Manage Feeds”.
Make sure your auto update interval is set to frequently update as you add or edit products.
Copy your Feed URL.
Login to your Facebook Business Manager account.
Click the Facebook Ads Menu and under the Assets Tab, click “Catalogs”.
Click the blue “Create Catalog” button.
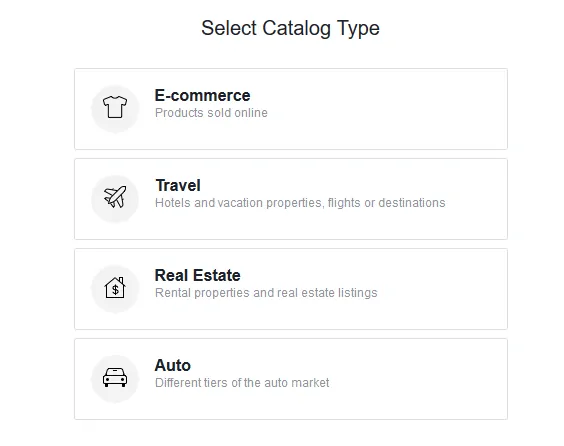
Select the catalog type and click “Next”.
Choose the page to link to the catalog.
Name your catalog.
Click “Create Catalog”.
Navigate to your newly created catalog.
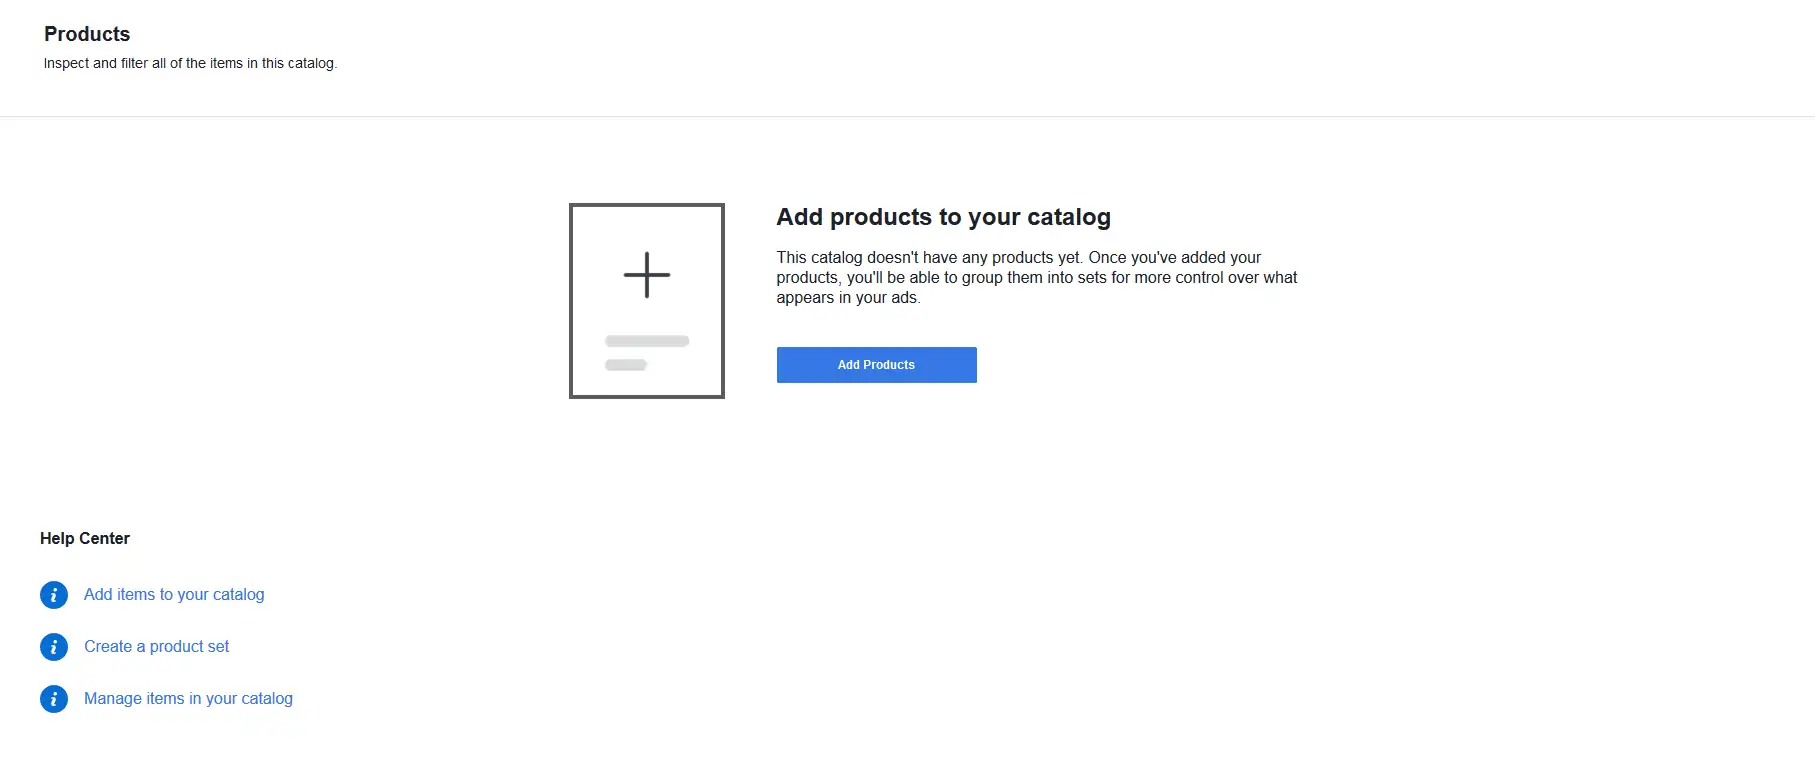
Select the “Products” tab.
Click the blue “Add Products” button.
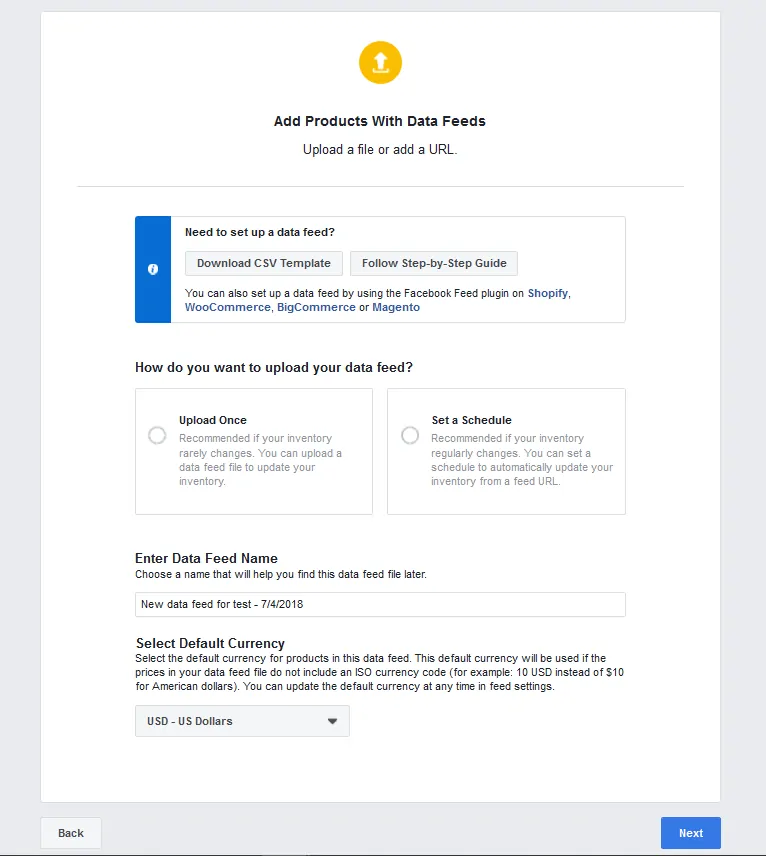
Select the “Use Data Feeds” option.
Click “Next”.
Choose “Set a Schedule”.
Enter the Data Feed URL that you copied from the Woofeed manage feed area.
Schedule how often you want the feed to upload to Facebook.
Name your feed.
Set your default currency, and click “Start Upload”.
Congratulations, you have successfully automated uploading and maintaining your Facebook Ads Catalog!
[/et_pb_aio_extended]
What makes a successful Facebook advertising campaign?
Your Facebook advertising campaign should have a clear goal (which should be more sales).
Your landing page should be optimized to be relevant and cohesive with your Facebook advertising campaign.
You should have a clear bidding strategy and a way to track your results.
Your ad imagery, video, and copy should be captivating and engaging. It is best to write emotional ad copy as opposed to traditional ad copy.
Emotional ad copy uses mind penetrating language to spark emotions and provoke action. Anyone can offer a discount, how can you speak to your customers emotions and address their fears?
Your Facebook advertising campaign should utilize audience segmentation and marketing data to maximize conversions and lower the cost per sale.
Launching Your Successful Facebook Ads Campaign
We will be creating a total of 3 Facebook advertising campaigns.
A prospect Facebook advertising campaign, which will look for and attempt to convert new prospects.
A remarketing Facebook advertising campaign, which will attempt to convert individuals already in the funnel.
An existing customers Facebook advertising campaign, which will target existing customers with personalized messaging.
[/et_pb_aio_extended]
Login to your Facebook advertising account and click the green “Create” button in the ads manager dashboard.
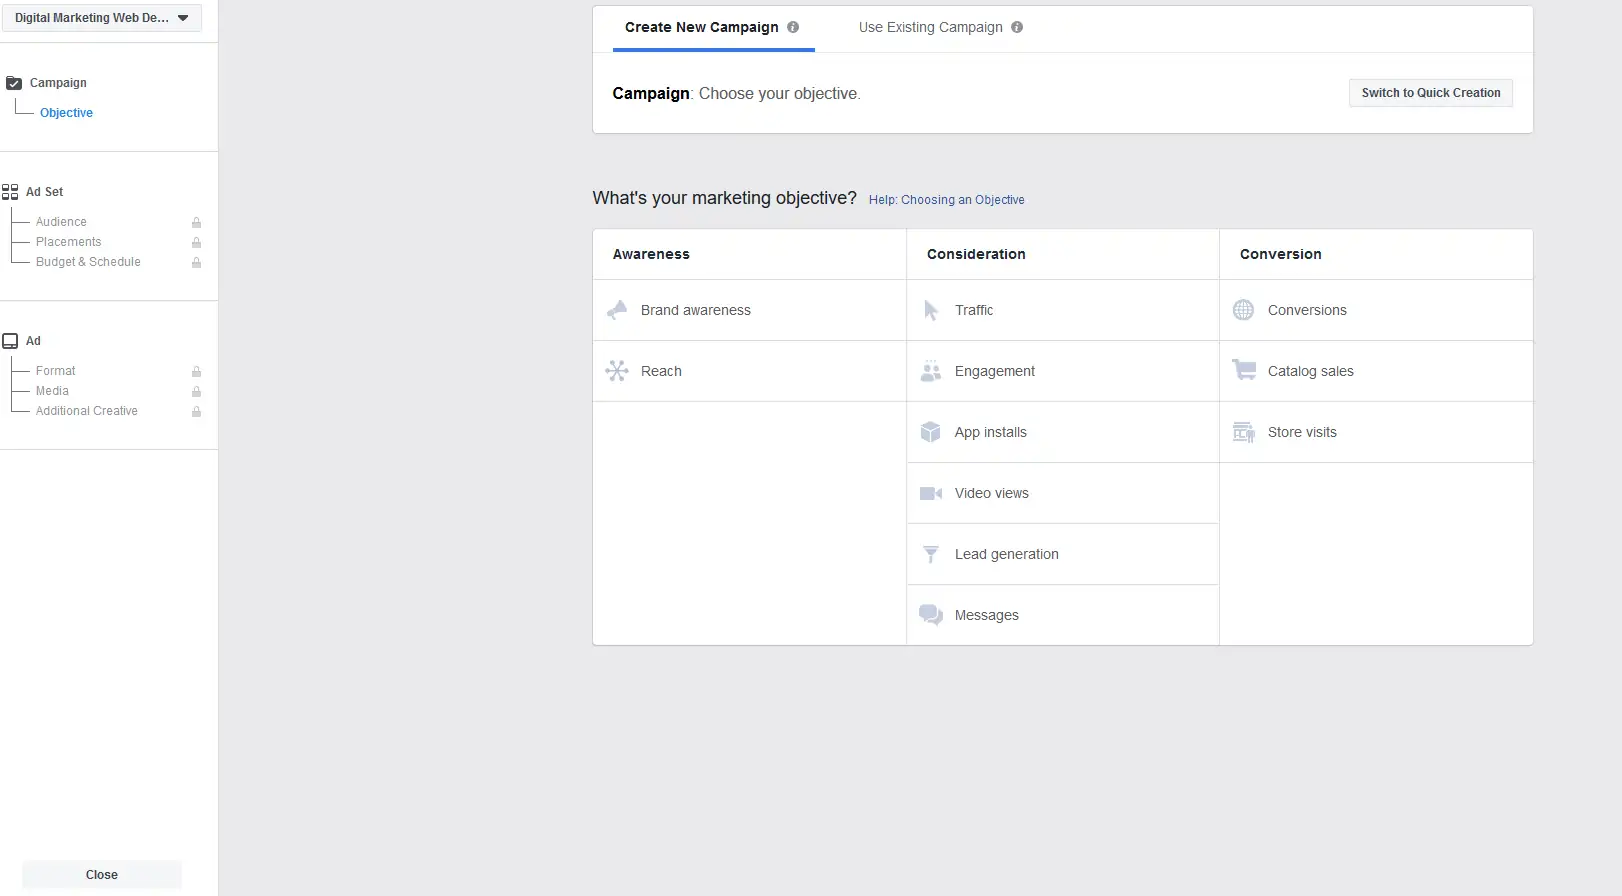
In the objectives screen, select “Conversions” and name your campaign.
Click “Continue”.
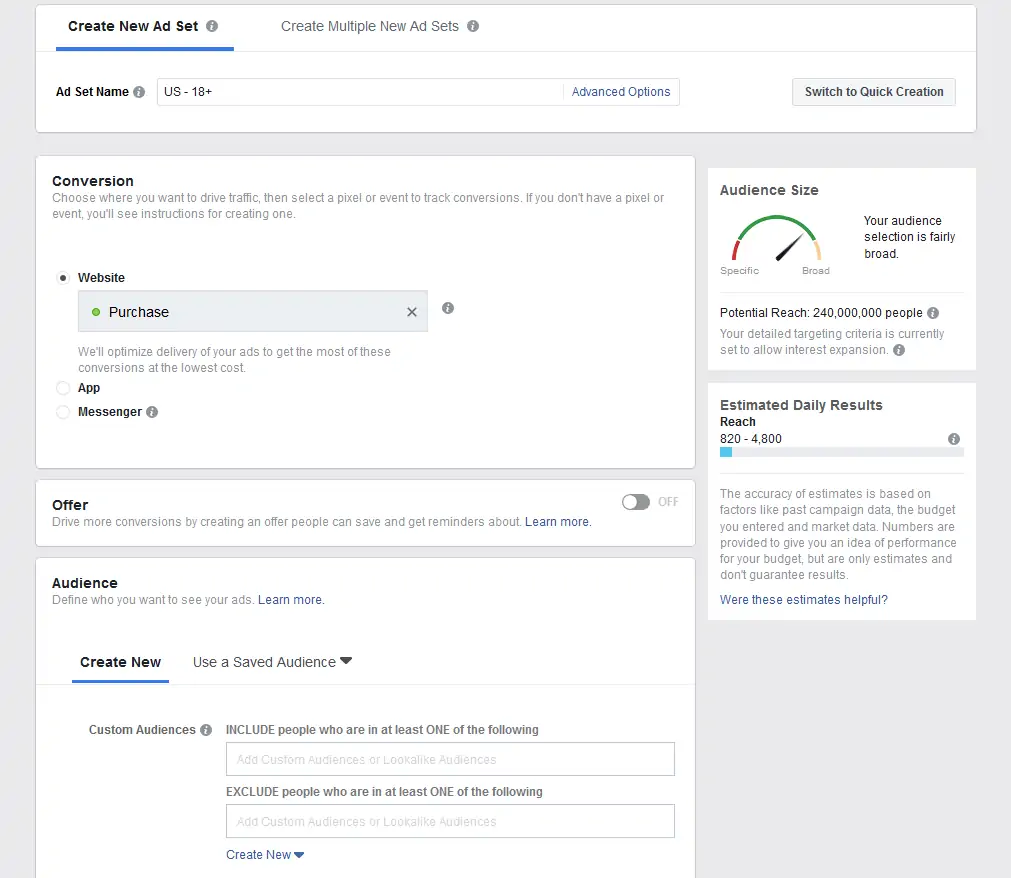
Name your ad set.
Select the website conversion you want to achieve and track. Usually it would be leads, purchases, or a custom event. We are using purchases, since that is our goal.
Under custom audiences, select your 1% lookalike audience.
Now click the small blue text that says “Exclude” right below the custom audiences box.
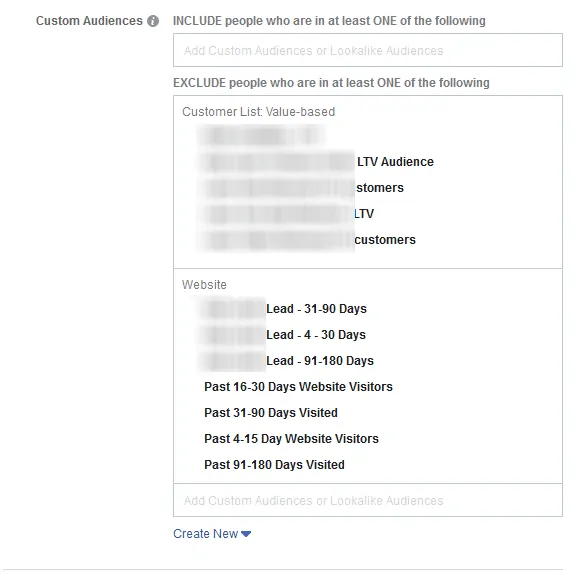
We want to exclude any Purchase event, so add every purchase audience to the excluded section. If you collect leads as well, you will want to exclude them here. You can create a separate campaign to send personalized messages to your leads audiences.
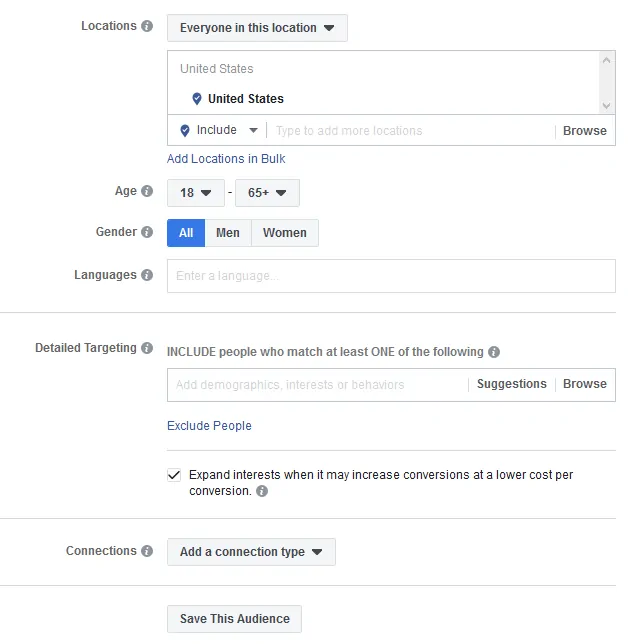
After you have excluded all of the audiences, set the locations that you want to target.
Then set your age range and gender as well as language.
You can leave detailed targeting blank, as we are already targeting a highly qualified lookalike audience and segmenting users out based upon their actions in our sales funnel.
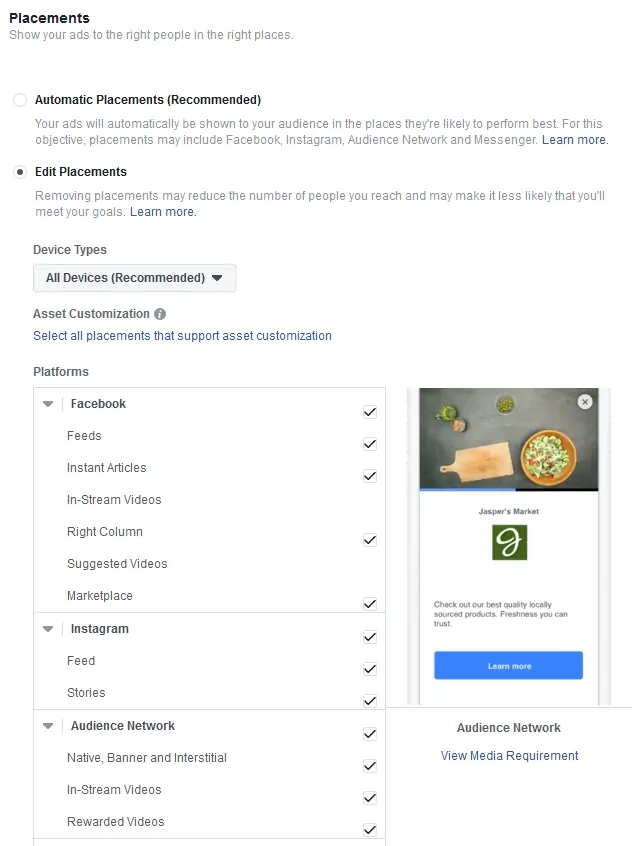
Select your placements, we recommend doing mobile only and targeting the Facebook Feed and Instagram Feeds only. This traffic seems to convert more frequently at a lower cost. However, the same may not be true in your niche and that is why testing is necessary.
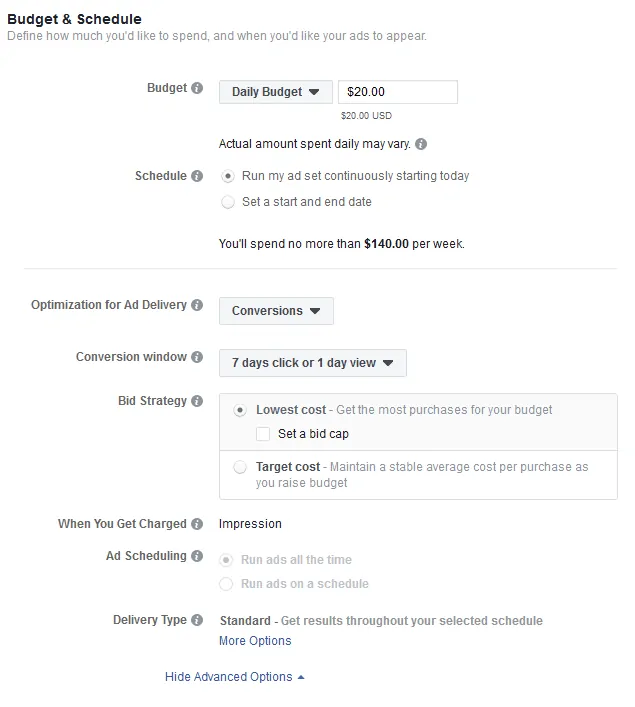
Enter your daily budget as well as the average amount of time it takes for a user to convert after interacting with an ad or key page on your website.
Click “Continue”.
You can use an existing post, your own images, free stock images from Facebook via Shutterstock, or videos.
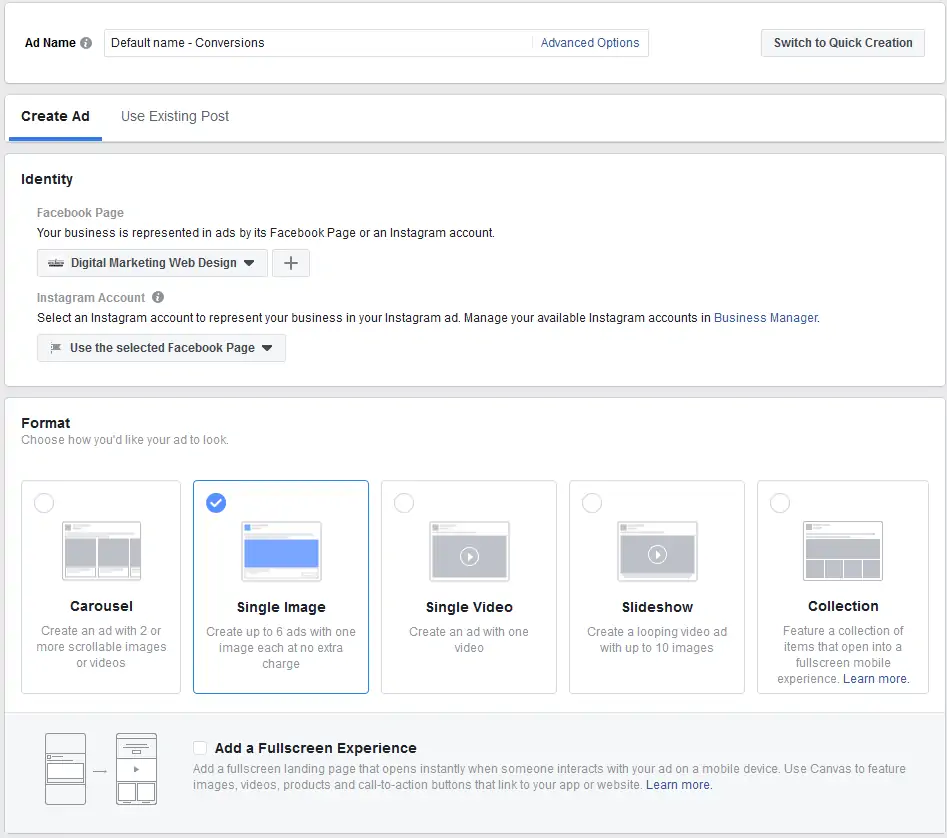
After you decide which type of ad format you want to utilize, you will fill in the details of your ad.
For this example we are using a single image ad.
Upload your image.
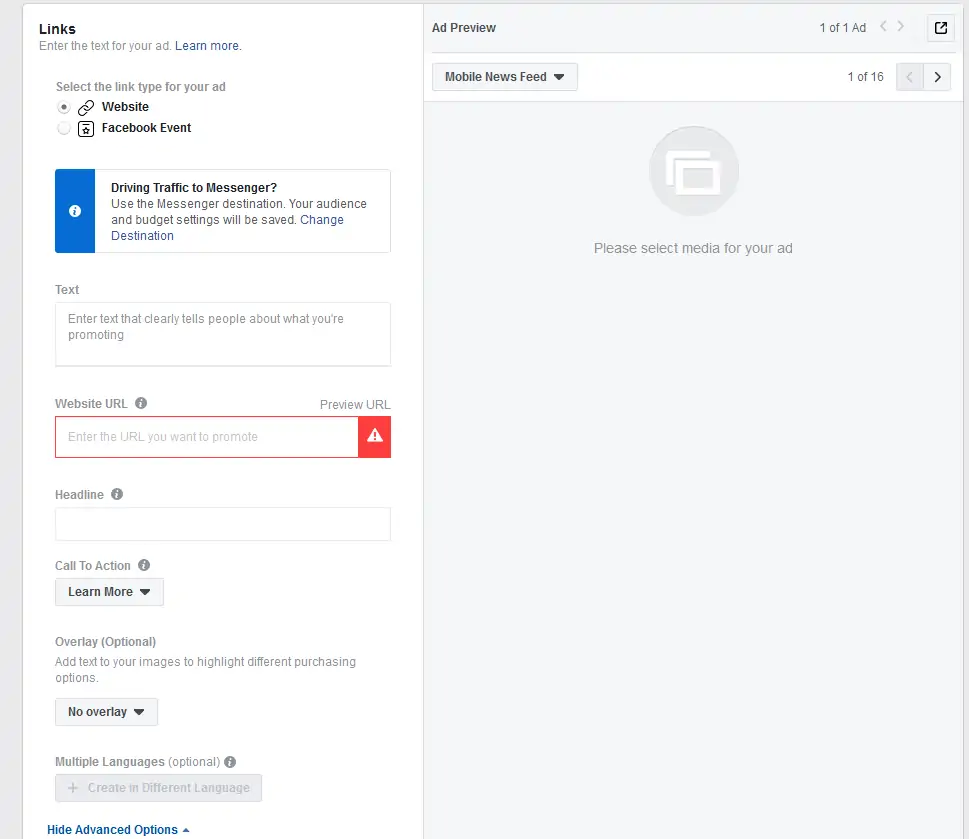
Select website for the link type.
Enter your ad copy. (Remember to take time to think how to write an emotionally compelling ad).
Enter in your website URL. (This should be your optimized landing page).
Enter your ad’s headline.
Select your call to action. Are they going to shop now, claim an offer, learn more, or something else?
Click “Show Advanced Options”.
Copy and paste the below text into your URL parameters to easily track your campaign in your Google Analytics account.
utm_campaign={{campaign.name}}&utm_source={{site_source_name}}
Make sure your Facebook pixel is turned on and click the green “Confirm” button.
Congratulations you have created your first highly targeted prospecting Facebook advertising campaign!
[/et_pb_aio_extended]
Login to your Facebook advertising account and click the green “Create” button in the ads manager dashboard.
Select the campaign goal you want to achieve and track. Usually it would be leads or purchases. However in this case, we are selecting “Catalog Sales” since we have already created a catalog, this is the easiest and most effective way to remarket to audiences.
Click “Continue”.
Select your product catalog, navigate forward and select your “Ad Set”.
Make sure your product set is correct.
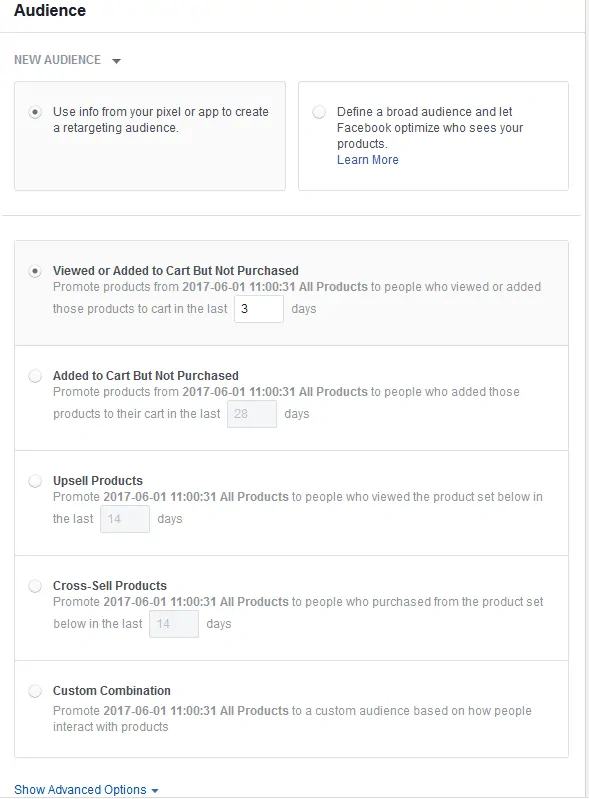
Under the “Audience” tab, Select “Create New” and “Use info from your pixel or app to create a retargeting audience.”
Select “Added to Cart, But Not Purchased”.
Enter 3 Days.
Why are we targeting 3 day cart adds? The reason is that these individuals have added the offer to their cart, but have not converted. Whether they were interrupted, ran into an obstacle, or otherwise, these individuals are ready to buy!
Click the blue text labeled “Show Advanced Options”.
Click the blue text labeled “Exclude”
We are going to exclude specific audiences just like we did for the Prospect Facebook Ads Campaign.
Exclude any previous customers, LTV value list, or purchasers as well as any leads.
Your customers who have already purchased from you, will receive a more personalized ad messaging campaign through an Existing Customers Facebook Ads Campaign.
If you do not want to exclude leads, that is fine, however for best results you are going to want to create a separate campaign targeting them as well.
After you have excluded purchasing customers and leads, set the location you want to target.
Then select the age range you want to target.
Next, Select the Gender and Language.
You can skip the detailed targeting since we are already using highly targeted audiences.
Leave the placement to “Automatic Placements”.
Optimize for “Conversion Events”.
The Event Type should be “Purchase”.
Set your conversion window and bid strategy.
Navigate forward to begin editing your ad.
Facebook will dynamically show your product ads to your remarketing audience. Some fields will be pre-filled with data, you can add to it or leave it as is.
In the text area, enter your ad copy. (Remember to take time to think how to write an emotionally compelling ad). Remember, they added an item to cart, but did not purchase. Whether it was from an interruption or something else, take the opportunity to write a personalized message urging them to finish checking out.
Select “Add a card to the end with your profile picture”.
Enter in your See More URL. This should be your optimized landing page.
Set your call to action button, in this case, we recommend “Shop Now”.
Click “Show Advanced Options”.
Copy and paste the below text into your URL parameters to easily track your campaign in your Google Analytics account.
utm_campaign={{campaign.name}}&utm_source={{site_source_name}}
Make sure your Facebook pixel is turned on and click the green “Confirm” button.
Congratulations you have created your first highly targeted dynamic remarketing Facebook advertising campaign!
Be sure to create another campaign just like this, but targeting 30 day add to carts and excluding 3 day add to carts as well as the other exclusions.
[/et_pb_aio_extended]
Login to your Facebook advertising account and click the green “Create” button in the ads manager dashboard.
In the objectives screen, select “Conversions” and name your campaign.
Click “Continue”.
Name your ad set.
Select the website conversion you want to achieve and track. Usually it would be leads, purchases, or a custom event. We are using purchases, since that is our goal.
Under custom audiences, select your LTV customers and any purchase event audiences you have.
Now set your age range and gender as well as language.
You can leave detailed targeting blank, as we are already targeting a highly qualified customer list and purchase event audiences.
Select your placements, we recommend doing mobile only and targeting the Facebook Feed and Instagram Feeds only. This traffic seems to convert more frequently at a lower cost. However, the same may not be true in your niche and that is why testing is necessary.
Enter your daily budget as well as the average amount of time it takes for a user to convert after interacting with an ad or key page on your website.
Click “Continue”.
You can use an existing post, your own images, free stock images from Facebook via Shutterstock, or videos.
After you decide which type of ad format you want to utilize, you will fill in the details of your ad.
For this example we are using a single image ad.
Upload your image.
Select website for the link type.
Enter your ad copy. These customers have already purchased from you! Create a personalized message to your existing customers! (Remember to take time to think how to write an emotionally compelling ad).
Enter in your website URL. (This should be your optimized landing page).
Enter your ad’s headline.
Select your call to action. Are they going to shop now, claim an offer, learn more, or something else?
Click “Show Advanced Options”.
Copy and paste the below text into your URL parameters to easily track your campaign in your Google Analytics account.
utm_campaign={{campaign.name}}&utm_source={{site_source_name}}
Make sure your Facebook pixel is turned on and click the green “Confirm” button.
Congratulations you have created your first highly targeted Existing Customers Facebook advertising campaign!
Want to learn more about Facebook Advertising? Click Here
[/et_pb_aio_extended]


